Time Entry Form
Open the entry form by clicking an empty cell in the calendar, clicking an existing entry, or clicking the New Time Entry button in the toolbar. The form remembers your last project, category, and task selection, so repeat entries are faster.
The Header
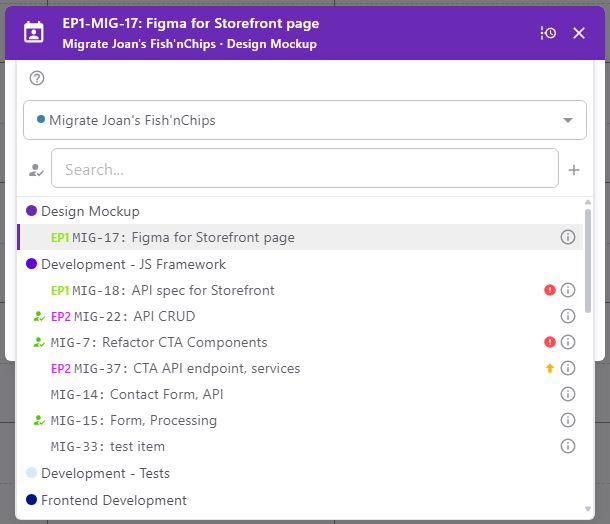
The colored bar at the top of the form shows what is currently selected. When a Time Flow task is linked, the header displays the task reference and title (e.g. EP1-MIG-17: Figma for Storefront page) with the project name and category name shown below, separated by a dot. When no task is linked, the header shows the category name with the project name below. If nothing is selected, it reads Select category with No Project Assigned below. When enabled, a plus icon to the right of the task filter allows the user to add a new task.
A calendar-person icon sits to the left of the text — this limits the listed tasks to the ones assigned to the current user. At the far right, a close button dismisses the form.
When editing an existing entry, a three-dot menu appears at the left end of the header with Duplicate and Delete options (separated by a divider). When a Time Flow task is linked, a task info button appears to the left of the close button — click it to open the full Task dialog without leaving the entry form.
Category/Task Selection
Click anywhere on the header to open the category/selection dropdown. It appears below the header. The picker combines project selection, category browsing, and task selection in one place. The search field auto-focuses when the picker opens.
Filter Chips
The top row of the picker shows the active filters.
@me — shown when the assigned-to-me filter is active.
Epic reference (e.g. EP-1) — shown when filtering by a specific Epic. The chip border and text match the Epic color.
Category name — shown when a category is pinned. The chip border and text match the category color.
Click the X on any chip to remove that filter, or click the clear-all button on the right to remove all filters at once. Filters persist for the browser session.
Project Selector
Below the chips, a dropdown shows the currently selected project. Each project in the list appears with a colored dot and the project name. Switching projects resets all active filters and clears the search text.
Search Bar
Below the project selector, a row contains three elements:
Assigned to me button — a person-with-check icon on the left. Click it to toggle the assigned-to-me filter on or off. The button turns blue when active.
Search field — type to filter categories and tasks by name or reference. A clear button appears at the end of the field when text is entered. Two special prefixes change the filter behavior:
Create button — a plus icon on the right. Click it to open the Create Time Flow Task dialog. Only appears when Time Flow is enabled for the selected project.
You can also use shortcuts while typing:
@ — filters to tasks assigned to you (the same as clicking on )
# — shows categories only, hiding all tasks beneath them.
When exactly one result remains (one task, or one category with no tasks), pressing Enter selects it automatically and closes the picker.
Results Area
Below the search bar, a scrollable list shows the matched categories and tasks. A progress bar appears across the top while tasks are loading.
If you have a task selected that would otherwise be hidden by the current filters, it appears pinned at the top of the results with a highlighted background.
Category Rows
Each category appears as a row with:
A colored dot on the left. Click the dot to pin (lock) this category — the dot gains a ring around it and all other categories are hidden. Click again to unpin.
The category name.
A check icon on the right when this category is the current selection (and no task is selected).
A colored left border when selected.
Click anywhere on the category row (except the dot) to select it as the entry's category. This closes the picker and updates the header and form border color.
In the list view, billable entries show a $ symbol. To change the billable setting for a category, update it under Projects > Categories.
"Billable" can also be over-ridden (if allowed) in a specific Project.
Task Rows
When Time Flow is enabled and the project has a board, task rows appear indented below each category. Each task row shows:
A green person-check icon on the left if the task is assigned to you. Otherwise the space is empty.
The Epic reference (e.g. EP1) in the Epic's color if the task belongs to an Epic. Click it to filter the list to that Epic.
The task reference (e.g. MIG-14:) followed by the task title.
On the right: a red block icon if the task is blocked; a priority icon — red alert circle for Critical, orange up arrow for High, gray dash for Medium, blue down arrow for Low.
An info button at the far right. Click it to open the Task dialog without leaving the entry form.
A colored left border when this task is the current selection.
Click anywhere on the task row (except the Epic reference and info button) to select both the task and its category. This closes the picker and updates the header to show the task reference and title.
Entry Details
Fill in the following fields:
Description — a text field for notes about the work performed. The field expands as you type.
Date — click the calendar icon to the right of the description to change the entry date.
Start Time and End Time — the start and end of the work period. Updating either recalculates the total hours. Times display according to your time format setting.
Total Hours — type a value directly or drag the slider below the time fields. Changing this adjusts the end time to match. The slider increments in steps set by the organization (default 5 minutes).
The time entry fields do their best to guess what time you are entering. For instance, if you enter an end time without AM/PM that would be before the start time, the form automatically infers PM. Entries like 10, 17, or 3AM will be interpreted and converted to the closest acceptable time.
If your organization requires descriptions, you must enter one before saving.
Task Complete
If you are tracking the last time entry against a Task, you can toggle the "Task complete" setting at the bottom of the form. When the time entry is saved, the Task will be marked as complete (Done) in Time Flow.

Tags
At the bottom of the form, you can add one or more tags to the entry. Tags help with filtering and reporting. Only the tags pre-configured by your organization can be applied.
Saving
Click Save to create a new entry or Update to save changes to an existing one. You can also press Ctrl+Enter (Cmd+Enter on Mac) from the description field to save.
Duplicating and Deleting
When editing an existing entry, open the three-dot menu at the left end of the header. From here you can:
Duplicate — creates a copy of the entry.
Delete — removes the entry.